The same Queen

Anyway Freespace sez:
Let's get talking about the MOON again, people!
So here is another promise kept:
For the record: You can get to the Moon with 33,7 %difference of fuel!!! That's 54,3% at start MINUS 20,6% at Pad 2,
Brighton Beach! Eat your hearts out!!! (again)
Now to back up my claims, here is how I did it, plus the photographic material to prove it
Take a standard DG3, 1 months O2&N2 reserve, Default (ISS&Moon) fuel reserve and Mark IV (260'000N) Engines,
Phoenix Industries skin (of course)
Load the ToTheMoon scenario that comes with IMFD. I am posting it here, so you don't have to bother ( left out the
MFD part in case you don't have IMFD, put in whatever you like). Leave the SH-01 in the scenario, it will be helpful:
------------
BEGIN_DESC
DeltaGlider ready for trans lunar injection.
END_DESC
BEGIN_ENVIRONMENT
System Sol
Date MJD 51982.9703756366
END_ENVIRONMENT
BEGIN_FOCUS
Ship GL-01
END_FOCUS
BEGIN_CAMERA
TARGET GL-01
MODE Cockpit
FOV 50.00
END_CAMERA
BEGIN_SHIPS
ISS
STATUS Orbiting Earth
RPOS -5710655.54 3590118.47 93270.28
RVEL 3848.900 6169.551 -2487.072
AROT 30.00 0.00 50.00
IDS 0:588 10 1:578 10 2:568 10
XPDR 466
END
Mir
STATUS Orbiting Earth
RPOS -5066788.89 265788.15 4345713.93
RVEL -5033.717 -357.649 -5847.488
AROT 0.00 -45.00 90.00
IDS 0:540 10 1:542 10 2:544 10
XPDR 482
END
Luna-OB1:Wheel
STATUS Orbiting Moon
RPOS 948076.85 2028314.04 728.81
RVEL -1340.387 626.551 0.333
AROT 0.00 0.00 -152.60
IDS 0:560 10 1:564 10
XPDR 494
END
GL-01:DeltaGliderIII
STATUS Orbiting Earth
RPOS 2895576.91 -124396.12 -6490459.16
RVEL 6822.118 -647.359 3051.514
AROT -12.22 -65.95 12.14
VROT -0.00 0.06 0.00
RCSMODE 2
PRPLEVEL 0:0.543 1:0.987
NAVFREQ 0 0 0 0
XPDR 0
NOSECONE 0 0.0000
GEAR 0 0.0000
AIRLOCK 0 0.0000
END
SH-01:ShuttleA
STATUS Landed Moon
BASE Brighton Beach:1
POS -33.4375000 41.1184067
HEADING 0.00
PRPLEVEL 0:1.000 1:1.000
NAVFREQ 0 0
XPDR 0
PODANGLE 0.0000 0.0000
DOCKSTATE 0 0.0000
AIRLOCK 0 0.0000
END
END_SHIPS
------------
Okay, so you can either follow the tutorials that come with IMFD (Lesson 1 and Lesson 3) or use your favourite
navigation tool to set up your flight to the moon.
Pick your time and burn for moon, standard Hohmann transfer more or less. Aftre the burn and various adjustments I
had 37% fuel left.
After about 3-4 days, you should be close to the Moon and ready for your retro burn. Now if you use the IMFD, you
can follow the Lesson 3 tutorial and try to get your orbit to pass over Brighton Beach. You can probably do it manually
to but I didn't try that.
Perform your retro and circularize your orbit at about 380km. With IMFD that's easy, otherwise you'll have to fiddle
with forward/backward and outward/inward burn at some distance from the moon (30000km), to set your perigee to
about the right altitude. Now in my case, I was following the tutorial which guided me to a reverse orbit (clockwise) it
is not necessary, but the tutorial had a different plan for Moon landing, which I then didn't follow anyway. You can
adjust whether your orbit will be clock or counterclock-wise, by applying pro/retro burn at a fair distance from the
moon. Just watch the orbit display and see how to hyperbola changes.
Assuming you're in a circular orbit, now comes the tricky part. You have to to a "Direct Landing" (TM)

also
known as Powered Descent Initiation (as they called it on Apollo Missions)
which you do by lowering your periapsis
to 10km (Apollo did 20km I think), and position the periapsis point a few degrees ahead of the Brighton Beach base.
This means, that you will reach your minimum 10km a few hundred km before the base and this gives you a nice
buffer area, where you can reduce your horizontal velocity to zero and keep your vertical velocity around 0, without
burning too much fuel on Hover engines.
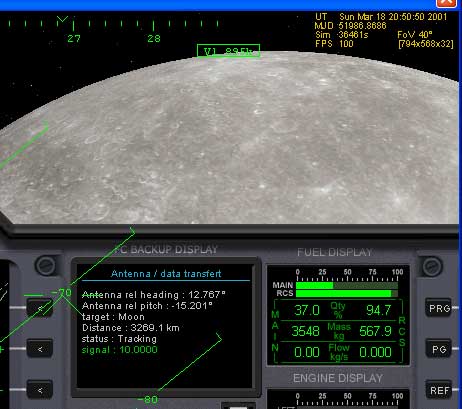
Now, you move your periapsis by appying prograde and retrograde RCS burns, anywhere on your orbit, but it's best
when you are 90degrees away from periapsis/apoapsis. Set the OrbitMFD target to SH-01. This will give you a visual
clue of where Brighton Beach is with relation to your orbit. You will notice as you burn pro/retrograde that the
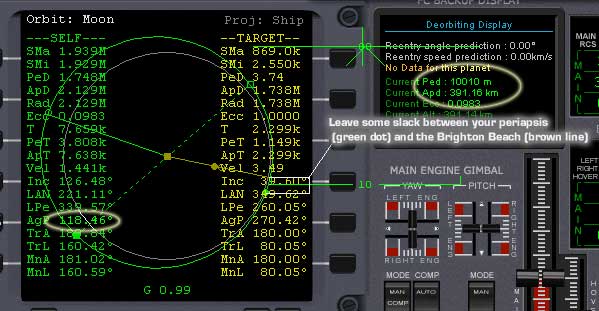
Argument of Perigee (AgP) changes. Now, move the periapsis to something like this (just the position, the value of
AgP will vary) on the picture and burn retrograde at apoapsis to lower the periapsis to 10.000m (display 2 - DG3
panel). It only takes a few seconds.
Now hit PAUSE, keeping the DG3 retrograde and take out your calculator. We need to calculate when to start
braking, so that we reach the Brighton Beach, having low or no horizontal velocity left. We will burn retro, as the Main
engines are stronger. At this point they provide about 15-16m/s^2 acceleration. We need to determine what our
velocity near the perigee will be. The formula for orbital velocity in a CIRCULAR orbit is as follows (BEAR WITH ME, it's
easy):
Velocity= SquareRoot(Grav.Constant*MassOfMoon/((RadiusOfMoon+Altitude)*1000)). The data I used are:
Grav.C = 6.6E-11
MassOfMoon = 7,34766E+22
RadiusOfMoon = 1738 km
Altitude = 390 km
Now this gives you about 1517 m/s. As we are NOT in a circular orbit, you need to measure your velocity at apoasis,
just after the retro burn is complete. I measure about 1441 m/s. The speed at periapsis will be greater than 1517
m/s, but I was lazy and I just used a dumb logic off adding the difference I measure at apoapsis (hehe). 1517-
1441=76m/s. I calculated what speed I would have in a circular 10km orbit and got 1674 m/s. I added this difference
to the calculated 1674+76=1755 m/s. Now this dumb adding probably has some math roots somewhere, but I just
figured, that if you go slower at apoapsis, you need to as much faster at periapsis to make up the difference and
keep the orbital energy the same. Turns out the actual speed at periapsis was just about 1755 add or take a few
m/s.
Anyway, we now know how fast we'll go. We also know how fast the DG3 can decelerate. about 15 m/s every
second. So you calculate at what distance you will come to a halt = 1755/15=117 km. So you need to start braking
117km from Brigton to come to a halt over it. Now being a living legend, I applied my experience and figured that the
Dg3 engines will actually increase thrust as fuel is burned and Dg3 gets lighter, so you can actually start even later
than that, say 115. So I start the burn, then after a little while, I turn the DG3 level and engage the PRO200SPEC7
autohover mode so the DG3 will keep it's drop rate at a manageable level. Set it to -10m/s or so and wait for the
Main engines to get the burn finished. Set your radio frequency to that of the SH-01 (108.00) and you can actually
use the DOCKING HUG to help you get the relative speed down to zero in the right time, plus help you yaw the ship,
so you don't fly passed the base. Also use the base VOR frequency to guide yourself in.
At the end you should look like this. I actually got the speed down too fast (main engine's thrust increased way over
16m/s), hence the engines are off:
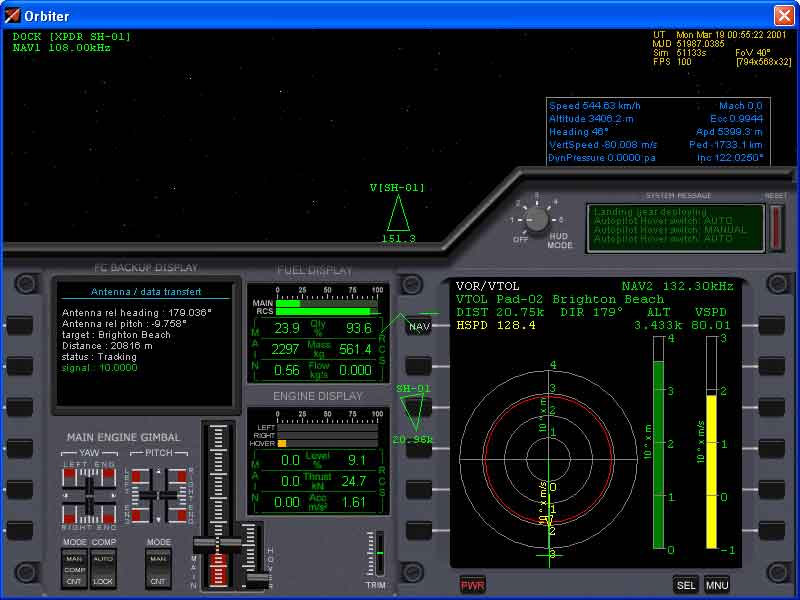
and like this

And my final stats:

Quesitons, class?


 Search
 Login
Login Register